Xah Particle Maker Tutorial
This page is a tutorial of Xah Particle Maker. In 20 minutes, you'll learn all the basics of how to use it.
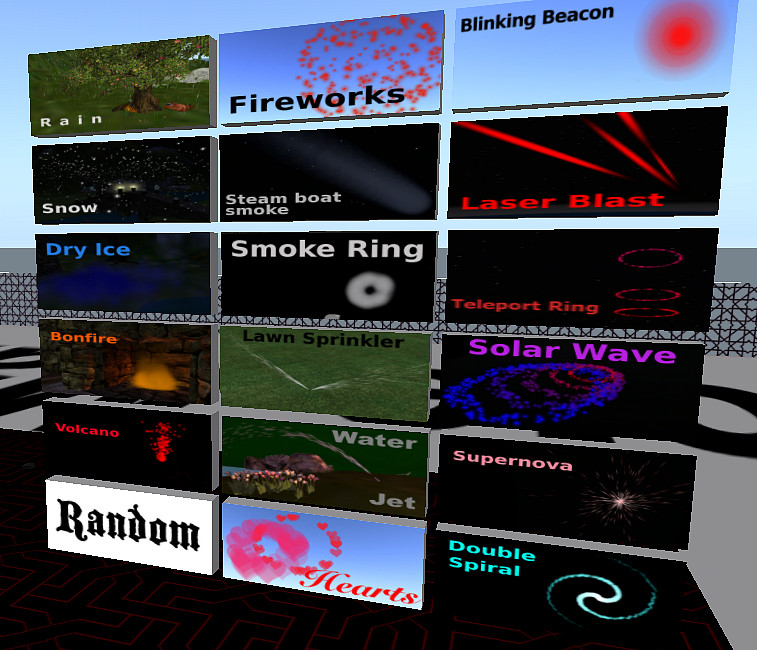
Preset Panels
Pattern Picker
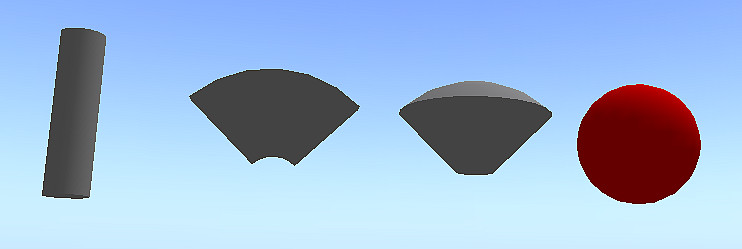
Click on the pattern picker changes the overall shape of the particle pattern.
- Ball = for exploding pattern (e.g. fireworks, round explosion, anything that burst out in a sphere.)
- Cone = for volcano-like patterns (e.g. volcano, water gun, laser, blood gush, bomb explosion, anything that shoots in a direction.)
- Fan = for fan-shaped pattern (water sprinkler, water fountain, blood gush)
- Tube = for pattern that does not move initially. (e.g. blinking light, smoke, simulated grass field, simulated firebug effect, mist, cloud, water droplet.)
The pattern that is currently in effect is colored red.
Advanced Pattern Tips
| Pattern | Button Shape | Tip |
|---|---|---|
| Explode | Ball | When using Explode, try to type BurstSpeedRange ‹min› ‹max› and BeginRadius ‹r›. BurstSpeedRange makes the particles bust out from a random speed from min to max. |
| Drop | Cylinder | This pattern does not move particles by default. Try typing ForceVector 0 0 -1 for a gravity effect and ForceVector 0 0 1 for a rising smoke effect. |
| Angle Cone | Cone | When using this pattern, try AngleRange 0 10 for a shooting gun effect, or AngleRange 90 90 for disk effect. |
| Angle | Fan Shape | When using this pattern, try the AngleRange command like Cone, but also try SpinVector 0 0 40 to have it behave like a rotating water spinkler or spiral. |
Color Picker
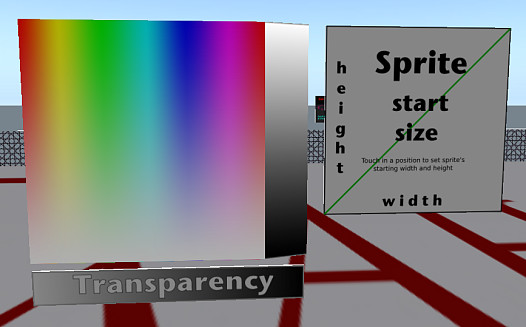
The Color Picker lets you select a color for your particle. Click on any color spot to make a chance. Or, you can click and hold, then move your mouse, to see changes in real time.
The gray vertical strip is for changing brightness.
The Transparency touchpad lets you set transparency.
The Sprite Size touchpad changes the particle image size.
Clicking on the bottom color picker (not shown above) will set ending color, so that the particles will shift its color from starting color to ending color. Similar for the bottom set of transparency slider and Sprite Size touchpad.
Parameter Sliders
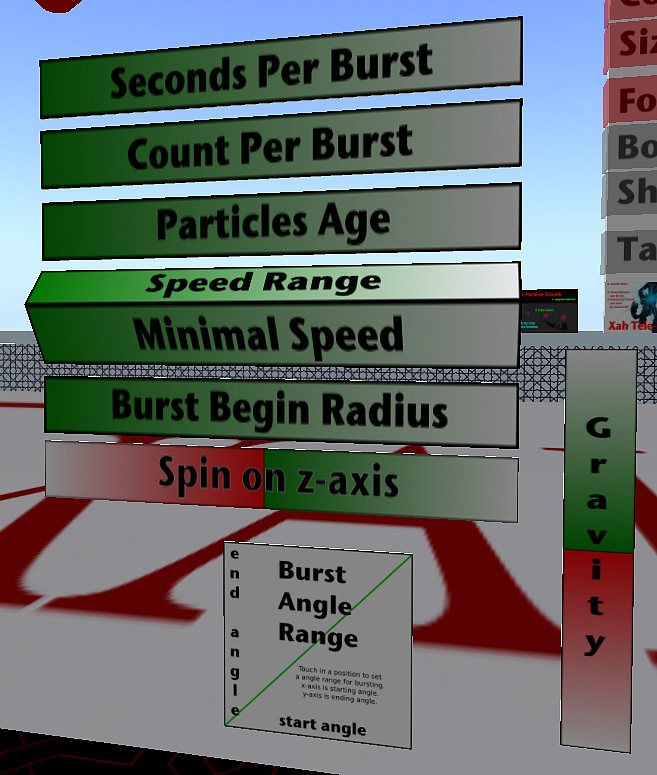
Each panel is a touchpad. They let you change particle parameters.
To use them, click on a position on a panel. Or, left click and hold down the button, then move your mouse. The particle is updated as you drag your mouse pointer over the panel.
| Slider | Purpose |
|---|---|
| Seconds Per Burst | How frequently the particle are generated. |
| Count Per Burst | Number of sprites per burst. |
| Particles Age | How long each sprites lasts. |
The above 3 controls the overall impression of how spammy is your particle.
| Slider | Purpose |
|---|---|
| Speed Range | The speed variation of the moving speed the sprite's initial bursting out. If the value is small such as 0, all sprites burst out at the same speed. If the value is large, some sprite burst out slowly, some very fast. |
| Minimal Speed | The minimal moving speed of the sprite's initial burst. |
When a particle is generated, the sprites “burst” out from the prim containing the particle script (the emitter prim). The speed they burst out is controlled by these two parameters.
| Slider | Purpose |
|---|---|
| Burst Begin Radius | The distance the sprites start to appear from the emitter. |
| Spin on z-axis | Makes the emitter spin. Similar to having the emitter prim rotate. Good for effects like spinning water sprinkler, spiral. |
| Gravity | Makes the sprites move toward ground (for rain effect), or towards sky (for smoke effect). |
On/Off Panel
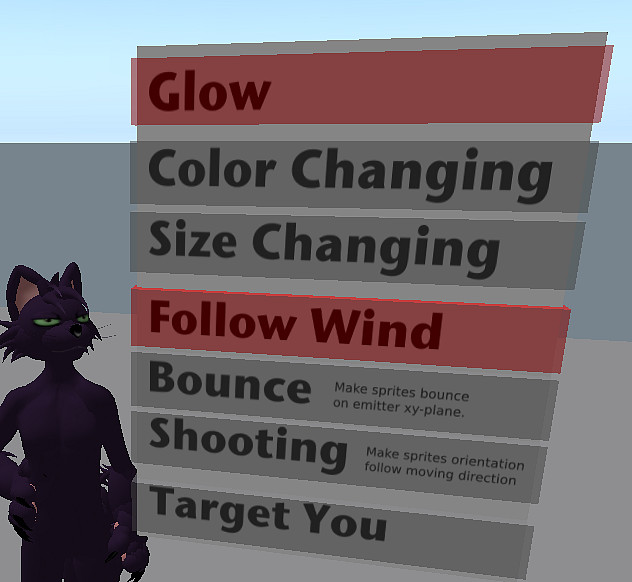
These are on/off switches that control the particle's behavior. Just try them. Their effects are apparent most of the time. The following is a detailed explanation.
| Panel Name | Meaning | Tips |
|---|---|---|
| Glow | Make the particle color glow. | This is like “Full Bright” for a prim. When a particle is set to glow, local light won't change its shade nor sunrise or sunset. |
| Color Changing | Make the color of the particles shift from one color to another. | |
| Follow Wind | Make the particles move by Second Life region wind. | Wind in Second Life has random direction, but the wind is always slow. To emulate leafs falling, use the Gravity touchpad and set it to about “- 0.5”. To emulate rising smoke, set Gravity to about “0.5”. |
| Bounce | Make the sprites bounce on a horizontal plane where the emitter prim is at. The sprites will never go under the emitter when this is on. | For example, if you have a water fountain on the 10th floor of a building, shooting water upwards, when the water droplets falls, you don't want them to go through the floor. Then, turn this on. If your particles do not go under the emitter, then this switch will have no visible effect. |
| Size Changing | Make the sprite change its width and height during its life. | When you turn this on, usually you also want to set StartScale ‹width› ‹height› and EndScale ‹width› ‹height›. |
| Shooting | Make the sprite change its orientation during its life time. When on, the sprites will be oriented in the same direction they are moving. | This behavior is good usually when you want to emulate something shooting out, like a gun or gushing blood. When you set this on, usually you want have Size Changing on too. |
| Target You | Make the particles flow towards you. |
Creating Full Perm Script
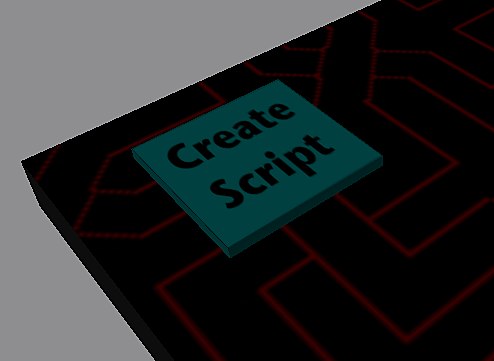
Clicking on this button generates the particle script. The code is shown in your chat.
To create your full perm particle effect, do:
- Press the Create Script button.
- Type Ctrl+h to bring up the chat window. Copy the yellow chat text
default {…}. - Now create a prim, go to the Content tab, press the New Script button. Open the newly created script. Paste over the content. Press Save then close the window. Now, your prim emits particles you just created.
Applying Particle Textures
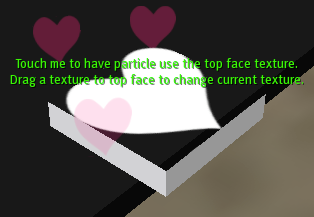
To apply a texture, rez the object named “Xah Particle Texture Tool”. Then, drag a texture to the tool's top face.
You can touch the object anytime to set the particle texture to use the prim's top face texture.
You can also set a texture by typing the command: texture ‹uuid›. If you want to set the texture to default, just type texture default.
You can rez multiple copies of this tool. This is convenient when you have several textures and what to compare them.
Be sure to check out the Linden bundled textures in your inventory. Open your inventory, and look in the folder named [Library/Textures/Waterfalls/Particle System].
Particle Parameter Display and Commands
For advanced users, you can set particle parameters by typing it in chat.
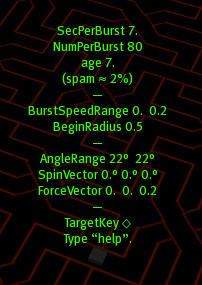
For detail about the parameters and commands, see: Xah Particle Maker Manual: Advanced.
Common Questions and How-to
For common questions, see: Xah Particle Maker Frequently Asked Questions.